Release Notes
OptiSHFT updates
Stay up to date with the latest product improvements, new features, and bug fixes.
Release 2.4
Release 2.4
New Features
New Features
Timesheets: Allowances
Added the ability to add allowances to unapproved timecards directly from the Timesheets module.
Employee Assignment: Future Start Date
Employee assignment to shifts is now restricted when the employee's start date is in the future. Employees cannot be assigned to shifts before their employment start date.
Hierarchy: Restrict Deletion of Nodes with Active Assignments
Updated hierarchy deletion logic to prevent users from deleting nodes with active assignments, preventing linked rosters and shifts from becoming orphaned and affecting hour calculations.
Hierarchy deletion remains available for admin/configuration purposes when there are no active assignments.
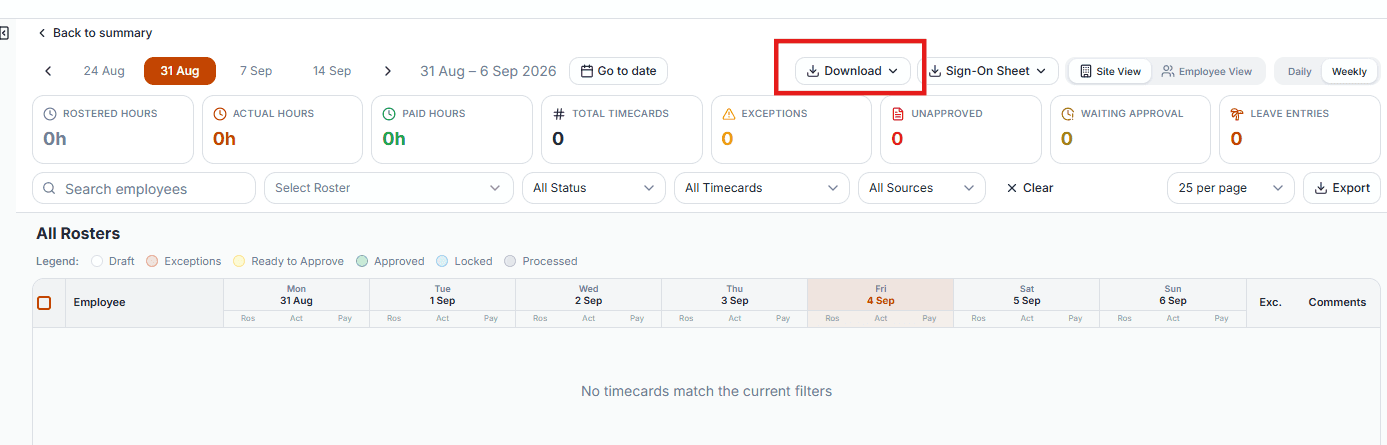
Timesheets: Rename “Payroll” to “Download”
In the Timesheets module, the “Payroll” label has been renamed to “Download” to better reflect its purpose.
Records: Reference ID
Added a Reference ID field to records, allowing users to easily copy the ID for Audit module purposes and tracking.
Rosters: Contact Information Updates
Ensured that contact information updated in the roster is reflected in the mobile app.
Rosters: Roster Export – New “Conf Status” Column
Added a new Conf Status column to the roster export, allowing users to identify the status of the roster associated with each shift. This makes it easier to distinguish cancelled rosters from active rosters when investigating unassigned shifts.
My Availability Preferences and Templates
My Availability Preferences
Users can now enter an employee’s Availability Preferences, including preferred working hours and shift count, directly from the Availability tab on their profile (Employees > Employee > Availability).

My Availability Calendar
The Availability Calendar has been expanded. Previously limited to Available and Unavailable, the calendar now also displays:
Template Availability
Template Unavailability
Edited Availability
Edited Unavailability
On Leave
Availability Templates (New)
User can now create an Availability Template to define recurring default availability.
When creating a template, the user can define the default availability as:
Always Available
Not Available
Undeclared
Templates support both click-and-edit and drag-and-drop editing.
Once created, a template automatically populates the Availability Calendar and replicates indefinitely, unless the template itself is changed.
User can then adjust availability on a weekly basis using Edited Availability / Edited Unavailability. This overwrites (not replaces) the template availability.
Release 2.4
Improvements
Rosters: Improved Roster Cancellation
The Roster Cancellation pop-up has been improved to provide clearer information about the impact of cancelling a roster, helping users understand what will be affected before proceeding with the cancellation.
The popup displays:
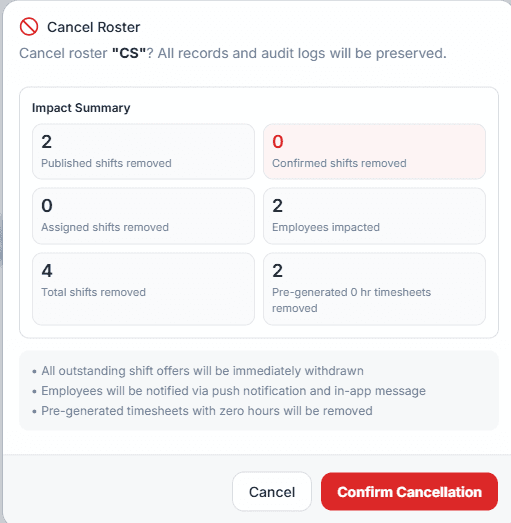
Published and confirmed shifts that will be removed
Assigned shifts and employees impacted
Total shifts and pre-generated timesheets that will be removed
Outstanding shift offers that will be withdrawn
Employee notifications that will be triggered
Unassigned shifts that will be removed
Users can review the impact before selecting Confirm Cancellation.
Unavailability Override Permission
The availability.override permission id allows authorized users to override an employee’s Template Availability and Edited Availability when creating or managing rosters.
Permission Details:
Permission ID:
availability.overrideLabel: Unavailability Override
Module: Roster
Note: This permission does not allow users to override or bypass Leave.
Ask Opti
The Ask Opti (an AI module) is now available to assist with Requirements and Accreditation management.
Initial use cases include:
Generate Requirements & Accreditations — Generate Requirements or Accreditations based on specified criteria.
Employee Qualification Lookup — Identify employees who have or are missing specific qualifications.
Requirement Lookup — Identify the qualifications and Accreditations required to work at a specific site or location.
Qualification Compliance — Identify employees who cannot work at a specific site due to missing required qualifications.
Release 2.4
New Features
Release notes
Roster: Shift Offer and Shift Bid
Two new workflows have been introduced in the Roster to help managers efficiently fill unassigned shifts: Shift Offer and Shift Bid.
Shift Offer
The Shift Offer workflow allows managers to fill an unassigned shift by offering it to eligible employees sequentially.
Managers can select multiple employees to receive the offer. The shift is offered to each employee in the specified order until an employee accepts the offer and fills the shift.
If an employee declines the offer, the system automatically proceeds to the next employee in the sequence. This allows managers to fill shifts efficiently without having to manually contact each employee.
Shift Bid
The Shift Bid workflow allows managers to offer an unassigned shift to multiple eligible employees at the same time, giving employees the opportunity to bid for the shift.
Employees can submit a bid for the available shift, after which the manager can review the bids and select an employee to fill the shift. Where configured, the shift can also be automatically assigned based on the applicable bid settings.
This provides managers with a flexible way to fill shifts while allowing employees to express their interest in available shifts.
Employment Contract Hours
The Employment Contract hours feature allows employment hours and working days to be defined for an employee. Employment Contracts support rostering, leave, and payment calculations.
Note: Before assigning a Roster Template to an employee record, the employee must first be assigned and locked to the Roster Template.
Contract Hours per Period — Define the contract period, minimum hours, and maximum hours. Base Contract Hours is derived from the employee’s Employment Status.
Contract Hours Warning — Displays the Agreed Hours against the Base Contract Hours to highlight any variance.
Agreed Contracted Days & Hours — Displays the employee’s agreed contract days and hours. When using From Roster Template, these values are pre-populated and read-only.
Save & Edit — Employment Contract details can be saved and updated as required.
Important Note: Changes to an employee’s Employment Contract may impact how the employee is paid and how leave is calculated.
Release 2.4
Fixes
Bug Fixes
Visa Restrictions
Fixed an issue where the Weekly restriction interval was not saved correctly for maximum-hour restrictions.
Roster Export
Fixed the bug where roster exports included rosters from other clients and markets sharing the same site. Exports now only include the selected client and market.
Roster Contact Details
Added mobile number validation when editing roster contact details to ensure only correctly formatted mobile numbers can be entered.
Release 2.3
Release 2.3
Release notes
New Features
Assign Employees to Templates
You can now assign employees directly to shifts in both Rotating and Non-Rotating templates, and lock those assignments to keep them protected from unintended changes.
Assign Mode: A new Assign Employees button switches the template into a dedicated Assign Mode for assigning employees. Select Exit Assign Mode to return to editing and creating shifts.
Assign to a shift: Click any shift to assign an employee to it.
Assign to a line:
Non-Rotating templates: When grouped by Employee Lines, click a line to assign one employee across every shift on it.
Rotating templates: Available in Rotation Configuration > Employee Line Rotation Assignment, click a line to assign one employee across every shift on it.
Lock shifts and lines: Once assigned, shifts and lines can be locked to protect them from changes. Locked shifts display a lock icon.
Read related articles for more information.
How to Assign Employees and Lock a Shift in Rotating Templates
How to Assign Employees and Lock a Shift in Non-Rotating Templates
Release 2.3
Release notes
New Features
Public Holiday Calendar Enhancements
Manage Default Dates
Users can now create a reusable list of default Public Holiday dates that can be applied to new calendars. Each default date includes a Name, Date, Start Time, and End Time. The default time range is 12:00–24:00.
Year Selector
Added a Year dropdown to filter and view calendars for a selected year. The available years are populated based on existing past and future calendars.
Add Calendar
Users can create a new calendar and configure:
Calendar Name
Region
Year
Start/End Date: defaults to 01/01/YYYY–31/12/YYYY
Hierarchy Nodes: optional, with multiple nodes supported
See Default Dates: apply the configured default holiday dates to the new calendar
Calendar Overview
Calendar entries now display the Calendar Name, Region, Year, Calendar Span, Number of Holiday Dates, and Assigned Hierarchy.
Calendar Actions
Add Calendar: Add a new public holiday date.
Create Future Year: Create a copy of an existing calendar for a future year, with the dates updated accordingly.
Copy Existing Calendar: Create a copy of an existing calendar.
Edit: Update the calendar details.
Delete: Delete a calendar with a double-confirmation step.
Notes
Calendar views are collapsed by default.
Calendars are displayed in order of creation.
Release 2.3
Release notes
New Features
Templates & Rosters: Add Line by Group
Added the Add Line option when Group By > Lines is selected in Templates.

Added the Add Employee Line option when Group By > Employee Lines is selected in Rosters.

Release 2.3
Release notes
New Features
Site: Address and Location Settings
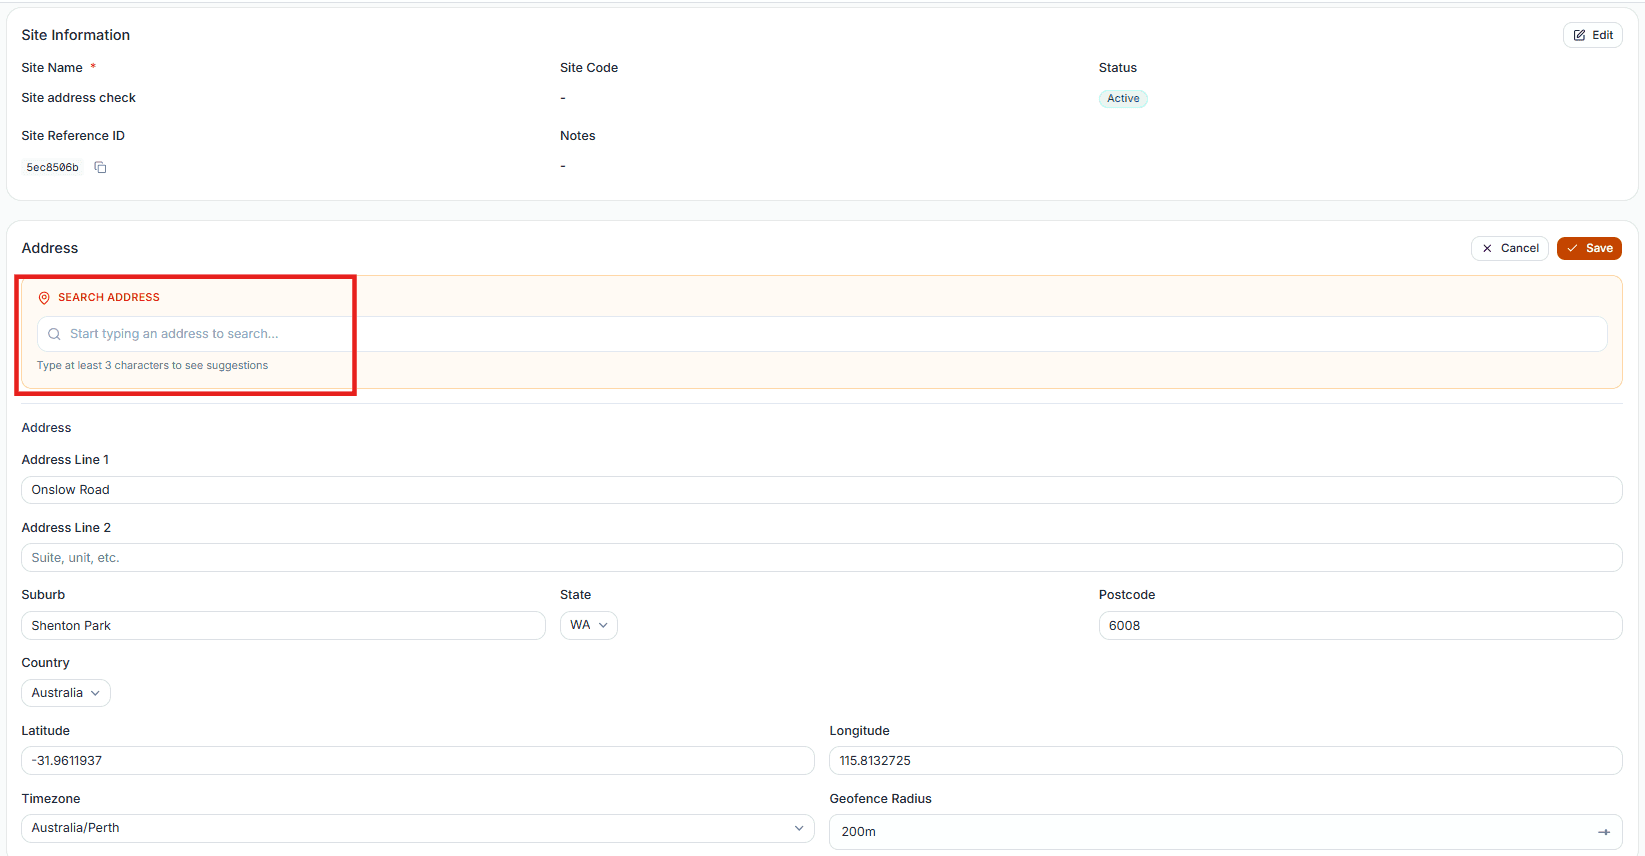
When editing the Address section of a site, users can search for a location and automatically populate the Address Line 1, Suburb, State, Postcode, Country, Latitude, Longitude, and Time Zone fields.
Release 2.3
New Features
Improvements
Employee Dashboard Enhancements
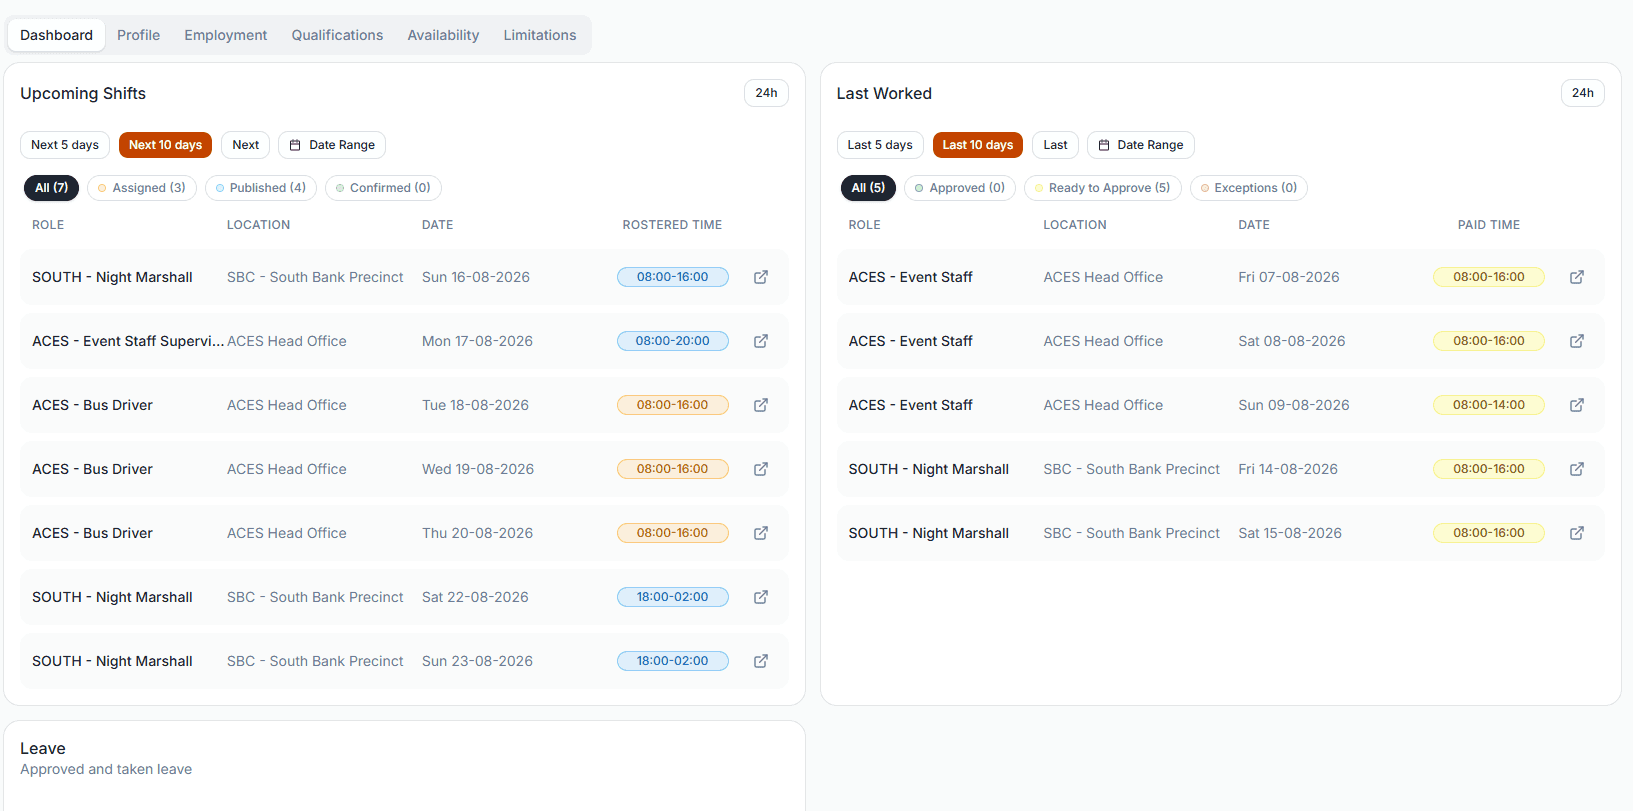
Enhanced the Employee Dashboard tables with consistent styling and colour-coded statuses:
Upcoming Shifts: Assigned, Published, and Confirmed
Last Worked: Approved, Ready to Approve, and Exceptions
Added a clickable legend to filter shifts by status and updated the row action to open the corresponding roster in a new browser tab.
Release 2.3
New Features
Release notes
Employee Base Contract Hours
Base Contract Hours Calculation
A new read-only Base Contract Hours field is available under Employee > Employment > Employment Contract. The value is automatically calculated from the employee’s assigned Award and Classification, based on the active Max Hours rule in Roster & Pay Rules.
Calculation: Max Hours ÷ Period (in weeks) = Base Contract Hours.
For example:
38 hours per week: 38 ÷ 1 = 38 hrs/week
304 hours over 8 weeks: 304 ÷ 8 = 38 hrs/week
If no matching rule is found, – is displayed. The value can be used for workforce calculations such as leave projections.
Release 2.3
Release notes
Improvements
Rosters Status and UI Changes
Renamed “Add Shift” to “New Shift”.
Moved the Color by Role option alongside the Shift Status tab.
Moved the Shift Status tab below the dropdown filter.
Moved the Edit/Assign and Locked/Unlocked toggles directly above the calendar.
Converted “Separate Shifts/Merge Same Shifts” into a dropdown.
Moved Group By to the same line as the date range, aligned right.
Converted the 7 Days / 14 Days selector into a dropdown.
Renamed “Go to Date” to “Today”.
Removed the text label from the Cancel button, leaving only the icon.
Removed the text label from the Save Draft button, leaving only the icon.
Updated the top-row pills to display Recurring Roster and Roster Assignment Type (e.g. Auto-Confirm, Accept, or Reject).
Renamed “Notes” to “Notes to Employee”.
The Pin header is now positioned in the first column, before the day columns.
For Recurring Rosters and Job Rosters, removed the “Recurring Roster” and “Job Roster” pills next to the “Published/Draft” status so that only one status pill is displayed.
Updated the top-right header to display the roster name in bold, with the site name shown as subtext.
Roster: Edit Contact Details
Users can now edit contact details after a roster has been created. Changes to contact details are also reflected appropriately on mobile.
Roster Status Display
Updated the roster status logic to evaluate all shifts, including assigned and unassigned shifts.
Completed: Roster period has passed.
Generate: Future roster with no shifts.
Draft: Roster has never been published.
Confirmed: All shifts are confirmed.
Published: All shifts are published.
In Progress: Roster is published but shifts have mixed statuses.
A roster will only display Published or Confirmed when 100% of shifts meet the relevant status. For example, if 1 shift is published and 19 remain unpublished, the roster displays In Progress instead of Published.
New Features
Release notes
Rosters: Unassign Confirmed Shift
You can now unassign employees from confirmed shifts, including both previous and upcoming shifts. When unassigning a shift, you'll be prompted to select a reason if one is required, or you can proceed without one if it's not mandatory. The employee will be automatically notified that they've been unassigned, and the reason selected (if applicable) is also logged in the audit trail for future reference.
Note: Enable Unassigned Confirmed Shift feature must be enabled.
Release 2.3
New Features
Employee Default Site
Quickly identify which site each employee primarily belongs to with the new Default Site assignment.
Navigate to: Employees > Employment > Employment Status > Default Site
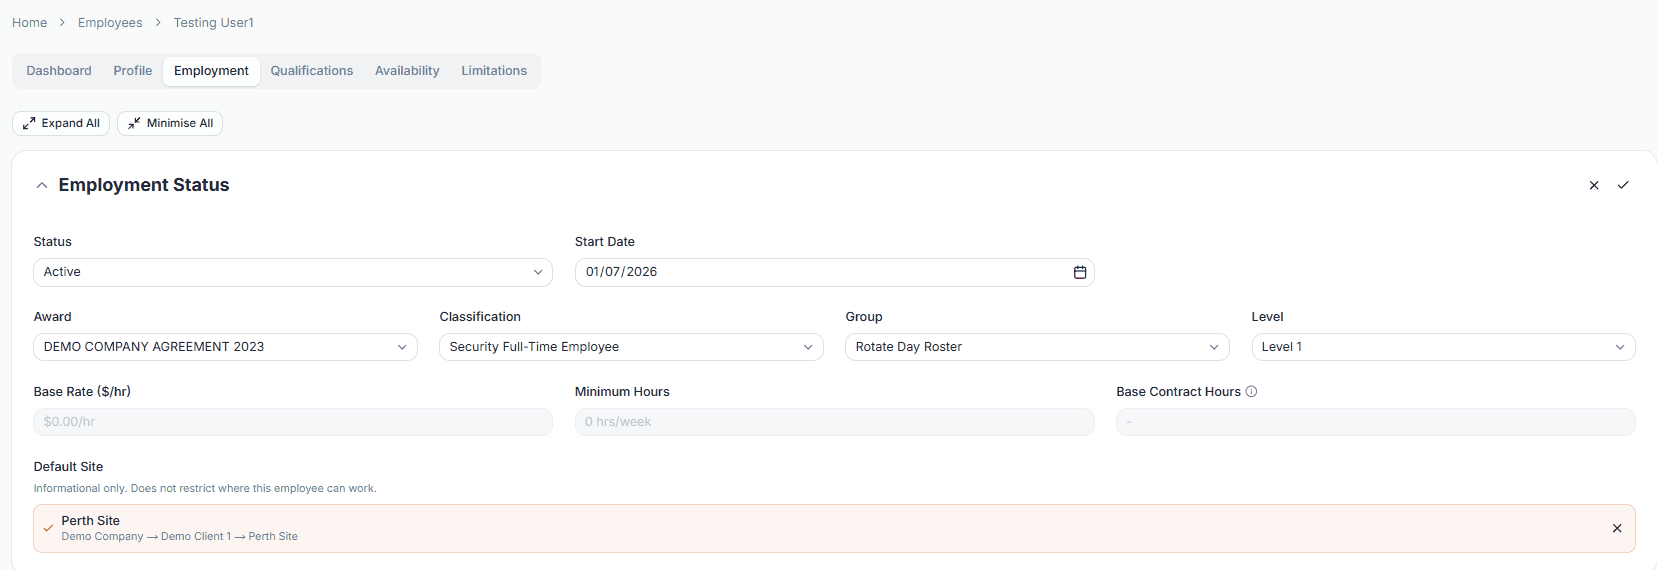
Notes:
Default Sites can only be assigned to “Site” nodes within your Hierarchy.
This field is for reference purposes only - assigning a Default Site does not restrict or affect where an employee can actually be scheduled or work.
Release 2.3
Release notes
New Features
Improvements
Shift ID Visibility and Shift Deletion
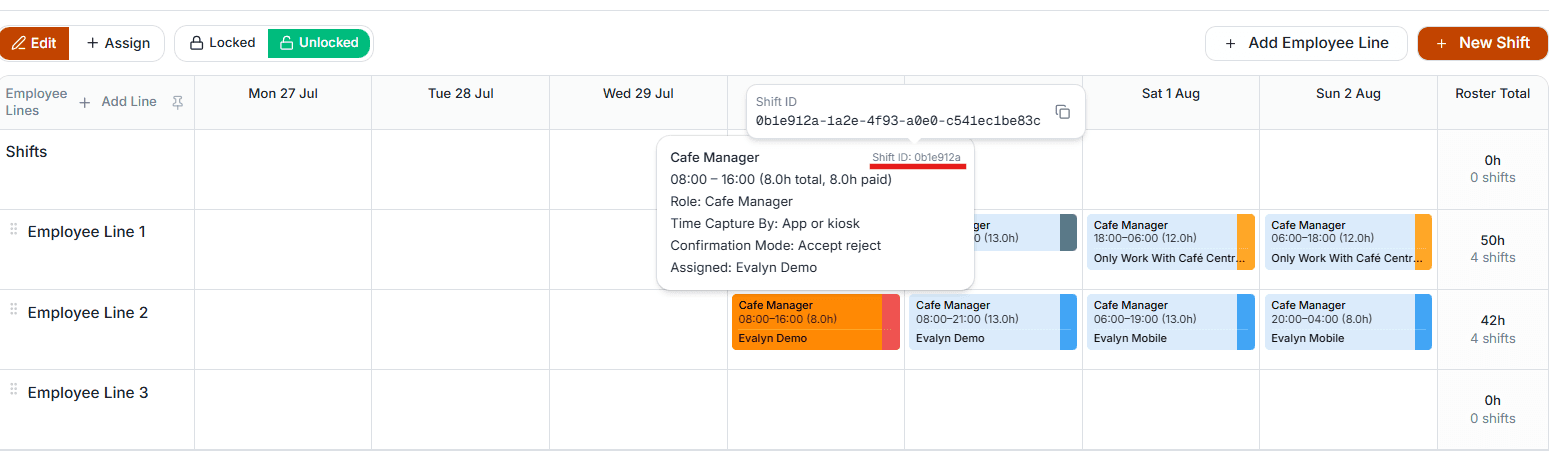
Every shift now has a unique, visible Shift ID, making it simple to identify, copy, and track individual shifts for auditing purposes.
What's new:
The Shift ID now appears in the top right corner of the shift tooltip. (Note: the roster must be in unlock mode for this to display.)
Hovering over the ID reveals the full Shift ID, with a copy button for quick access.
Cancel Shift vs. Delete Shift Workflow
The shift removal workflow has been updated to make Cancel Shift and Delete Shift distinct actions, each with its own behavior.
What's changed:
Delete Shift now completely removes the shift. This button appears only when a shift has not been assigned.
Cancel Shift now notifies the assigned employee and removes the associated timesheet. This button replaces Delete once a shift has been assigned.
Confirmation messages:
Delete: "Are you sure you want to delete this shift? This action cannot be undone and the item will be permanently removed."
Cancel: "Are you sure you want to cancel this shift? Once cancelled, the user will be notified, the shift will be removed and the timesheet will be deleted."
Note:
A shift cannot be deleted or cancelled once it has already started.
For past shifts, an unassigned shift can still be deleted, and an assigned shift can still be cancelled.
Deleting a cancelled shift will fail, with the message: "This shift is already cancelled."
Release notes
New Permission Groups
Supervisor / CRO
Same access as Client View, plus:
Vein Enrolment
Ability to print Sign-on sheets
SSC Administrator
Same access as Roster Manager, plus:
Ability to add attachments to Work Orders/Rosters
Release 2.3
Release notes
Mobile Application Rollout: Country Availability
The Mobile Application is now rolling out to employees, with download invitations.
Where it's available:
The app is launching in the following countries:
Australia
Bangladesh
Brazil
India
Indonesia
Nepal
New Zealand
Pakistan
Philippines
United Kingdom
United States of America
Not seeing the app in your country?
If you're located outside these regions, you'll be prompted to change your app store region to Australia in order to access the app. If you have an existing subscription tied to your home country's app store, please reach out to our support team so we can look into adding your region.
Release 2.3
Release notes
New Features
Mobile App Download Status
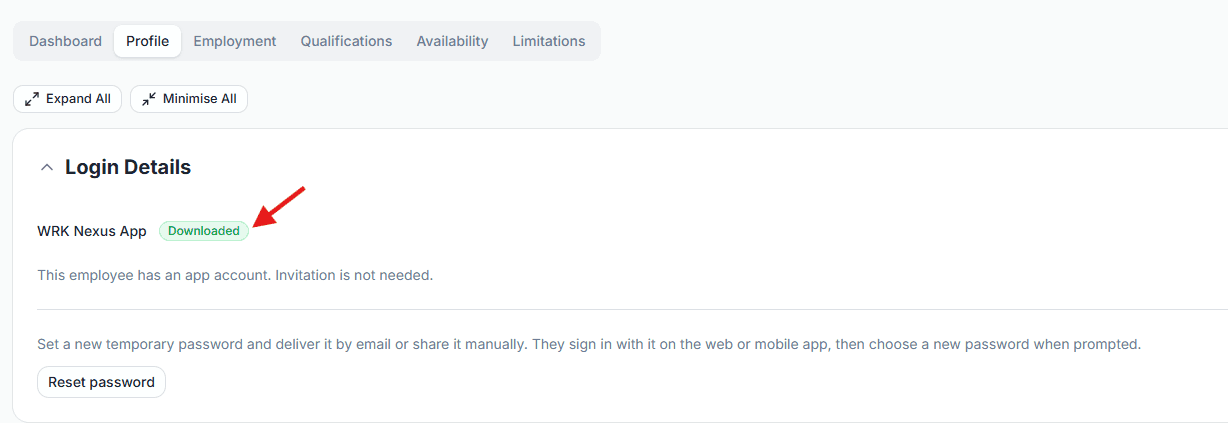
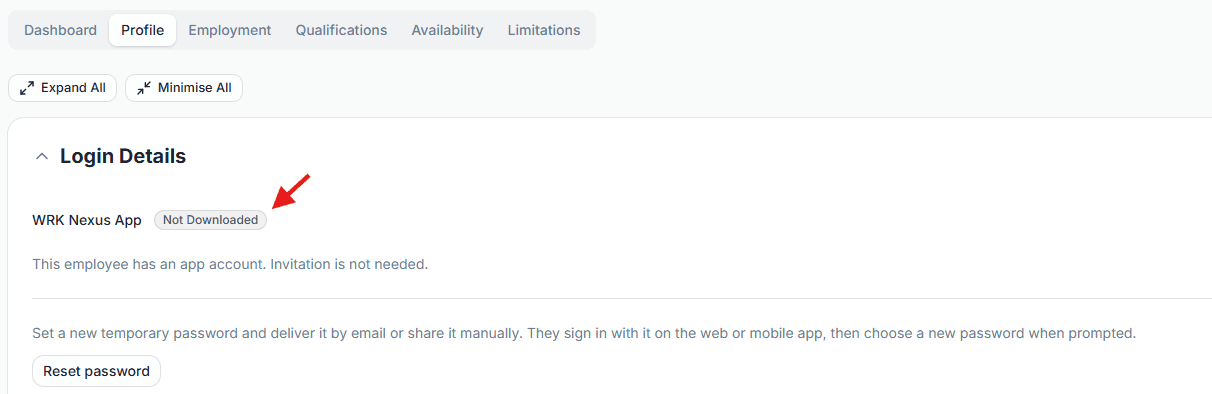
You can now identify whether an employee has downloaded the mobile app directly from their Employee Profile.
Employee has downloaded the app
Employee has not yet downloaded the app
New Features
Improvements
Release notes
Work Orders
Creating multiple shifts within a work order is now supported, with pagination added to help you navigate through them more easily.
Release 2.3
Release notes
Payroll Timesheets: Dashboard, Timesheets, and Process & Export
We’ve made several improvements to the Payroll Timesheets module, including the Dashboard, Timesheets tab, and Process & Export screen, to improve payroll tracking, visibility, and overall usability.
What’s new in Payroll Timesheets:
Dashboard
Payroll Cycle Progress Tracker: Total Processed and timesheet statuses are now mapped to the tracker, with labeling updated to match the Timesheet Status Legend.

Status counters: The [X]/12 counter now clearly reflects the number of timesheets in a given status against the total employee count.

Current pay period highlighting: A “New (Current)” badge now marks the current pay period.
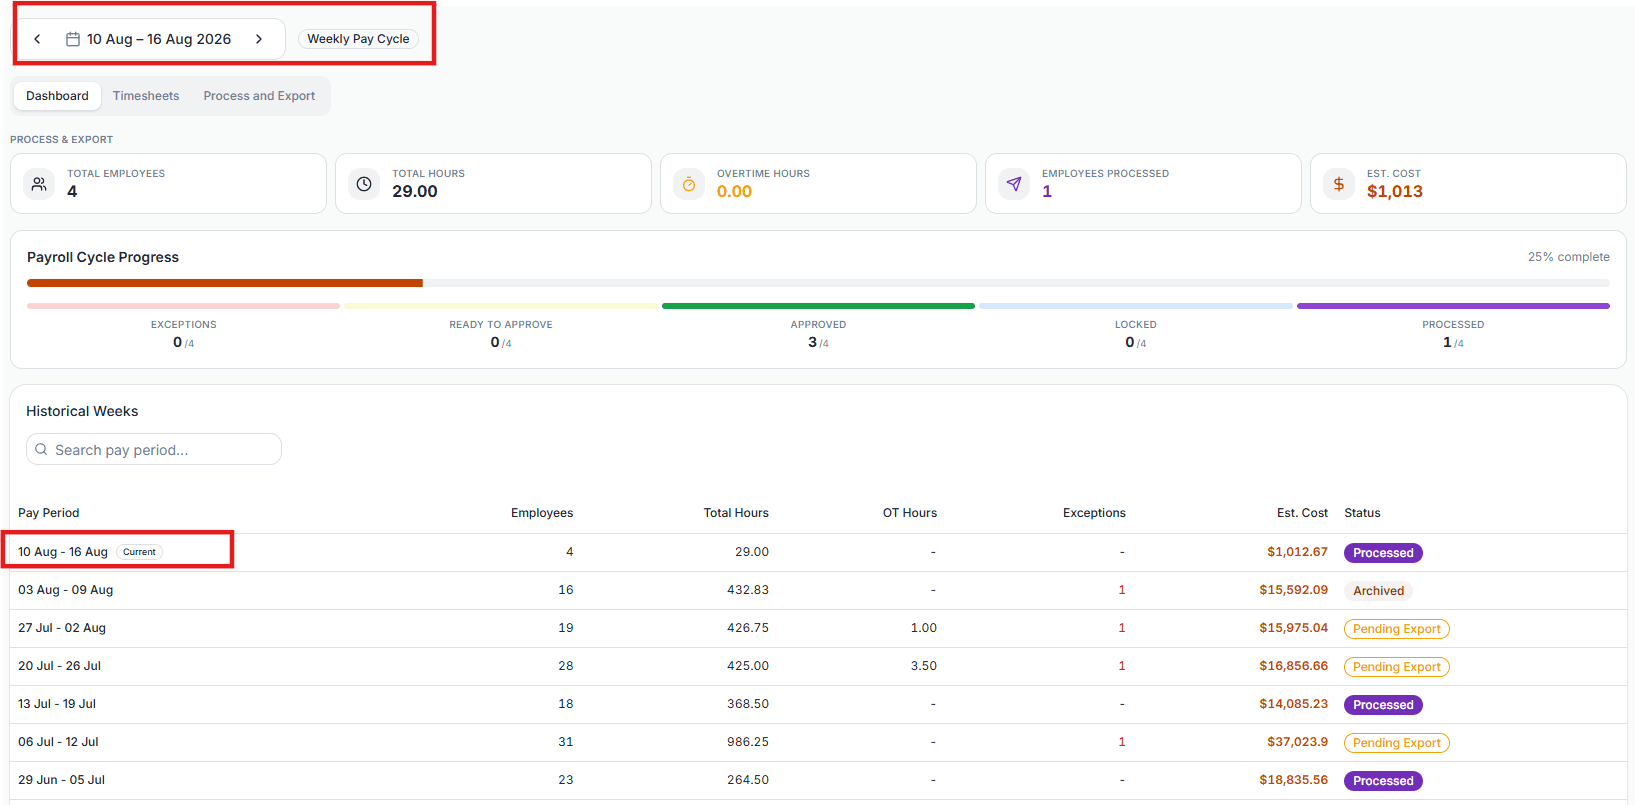
Leave and comment indicators: The Timesheets tab now surfaces key payroll signals: a Leave icon, a teal background on cells marked as Leave, and a Comments icon.
Employee details in a new tab: Clicking into an employee now opens their details in a new tab instead of drilling down in place.
Employee grouping in Process & Export: Employees are now grouped using an accordion with a clear pay rate breakdown, with each line representing a role and its associated pay rate (up to 5 lines per employee).
Release notes
Improvements
Payroll Timesheet Export: Column Reordering
Columns in the Payroll Timesheet export have been rearranged to the order below.
Updated column order:
Hours
Pay Code
Pay Rate
Pay Value
Total Hours
Shift ID
Shift Name
Role
Job Roster
Work Order
Quote Number
Cost Code
Notes
Tags
Employee Classification
Classification (Staff)
Group (Staff)
Level (Applied for Pay)
Status
Mark As
Confirmation User
Confirmation Timestamp
Release 2.3
Release notes
Audit Module
New Audit Module released, you can find out more about this new feature here:
Release 2.3
Release notes
New Features
Compliance Explanation
Assigning employees to shifts is now more transparent. The new Compliance Explanation feature lets you search for an employee and quickly find the reason they cannot be assigned to a shift. Whether it’s a missing or expired qualification, leave, or another compliance rule, the explanation is available directly from the Employee Availability window.
Selecting Explain displays a clear breakdown of the compliance issues preventing assignment, helping you identify and resolve rostering conflicts without manually checking employee records. Where applicable, you can also view additional details about the issue or override soft rule warnings if you have the required permissions.
How to Use Compliance Explanation
In the Roster, assign an employee to a shift.
Click Explain Compliance.
Search for the employee and select their name.
Review the reasons why the employee cannot be rostered to the shift.
Key Benefits
Search for an employee and quickly identify why they cannot be assigned to a shift.
See clear explanations for each compliance issue preventing shift assignment.
Identify missing or expired qualifications and accreditations more quickly.
Understand other assignment restrictions, such as leave, employee status, hierarchy restrictions, or unavailability.
Access additional details and override eligible soft warnings (where permitted).
This enhancement streamlines the rostering process by making compliance checks more visible and easier to manage.
Release 2.3
Release notes
Improvements
Employee Record Export
App Download Column
You can now add the App Download column to Employee Records for export, making it easy to identify employees who have downloaded the mobile app. To do this, go to the Employee module and add the column to your export.
Date Format
The Employee Export has been updated with the following date format changes:
Removed the empty time component (e.g. T00:00:00.000Z) from all date fields.
Start Date now shows the date only.
All date columns use the DD-MM-YYYY format.
Scope: Employee Export only.
Release 2.3
Fixes
Bug Fixes
Access Management
SCC Administrator permissions fixed, users with this access level are now able to add attachments to Work Orders and Rosters
Role Management
You can now assign multiple roles to a user.
Rosters
Selecting Today now highlights the column for the current date.
The system now calculates Maximum Contract Hours using a fixed roster week (Monday–Sunday) instead of a rolling 7-day period.
The Roster header now correctly displays "Employee" instead of "Start Time" when the roster is grouped by Employee.
Templates
Your selected Rotate Every option is now retained when reopening a template saved as Ready to Use.
Mobile App
Mobile App – Clock In Screen: Added a Done button to the clock code keyboard, making it easier to dismiss the keyboard and access the Clock In button.
Extended the mobile app token timeout from 7 days to 12 months, reducing the need for users to log in repeatedly.
Timesheet
You are now able to search the Employee Full Name.
Resolved an issue where cancelled shifts with biometric data could be exported to the payroll timesheet with a blank pay code. Cancelled shifts are no longer included in the timesheet or payroll export.
Qualification
Capitalisation entered for qualification and other requirement names is now preserved when saving.
Public Holiday
Darwin Show Day (24 July) has been added to the NT Public Holidays calendar.
Custom Payrates Export
Custom Pay Rate export was previously limited to standard levels (e.g. 1, 2, 3) and did not include additional levels such as 1.1 and 1.9. All configured pay rate levels are now included in the export.
Release 2.2
Release 2.2
New Features
Improvements
Requirements Module Update
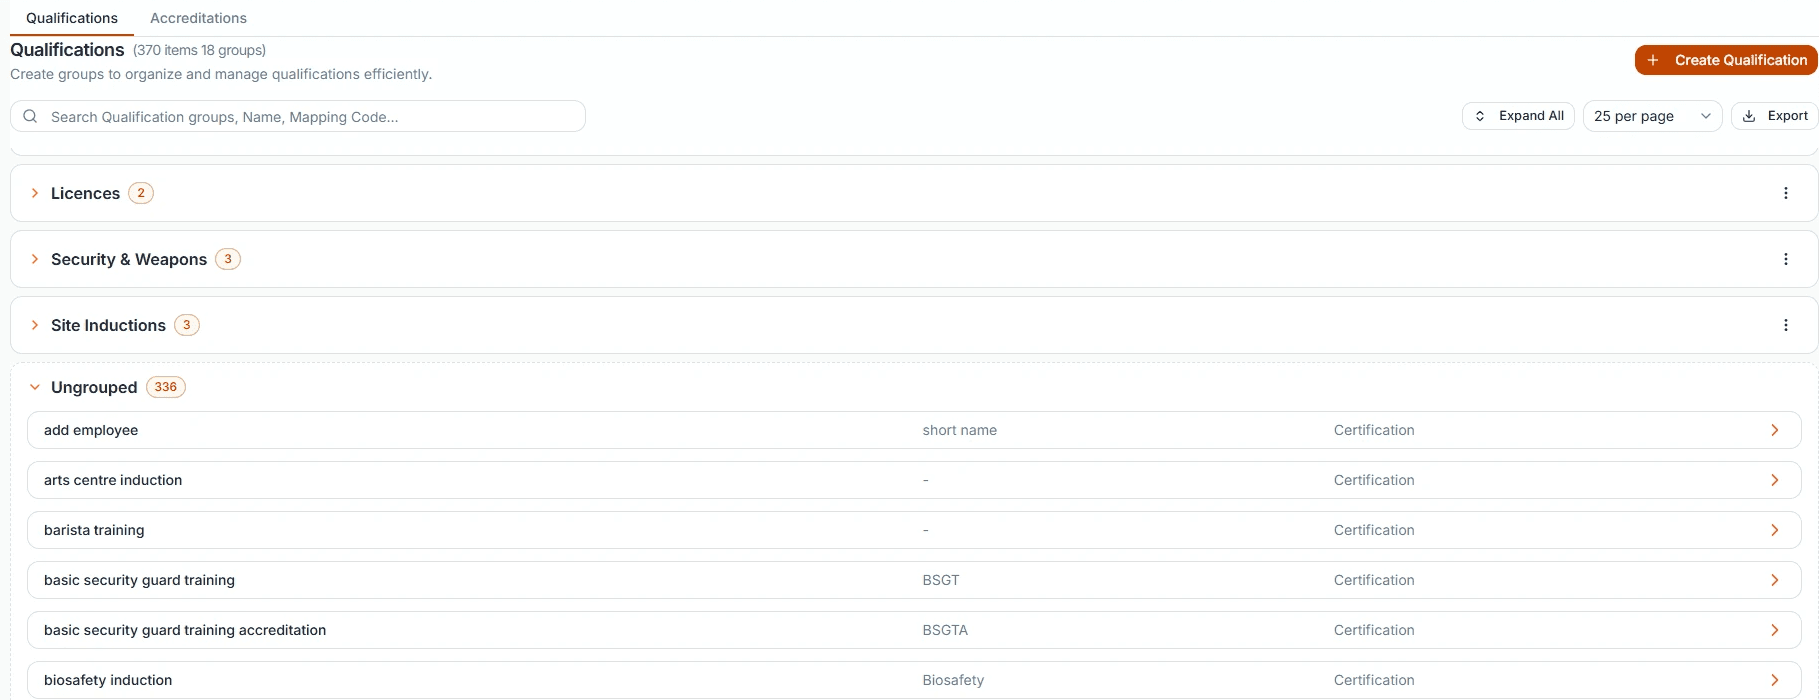
We’ve introduced the Requirement New module, allowing you to configure the information required when creating or editing Employees, Clients, and Sites.
Configuration Options
You can now choose whether the Qualification Issue Date and Expiry Date are mandatory or optional.
You can also add custom fields and choose whether they are required or optional. These fields are for record-keeping purposes only and do not affect compliance.
Supported Custom Field Types
Field Type | Description |
|---|---|
Text | Enter the field name. |
Date | Enter the field name and specify whether the field is required. |
Checkbox | Enter the field name and add multiple checkbox options. |
Radio Button | Enter the field name and define the available options. |
Dropdown | Enter the field name and add the selectable dropdown options. |
Attachment | Enter the field name and configure the maximum number of files and file size allowed for uploads. |
These configuration options allow you to tailor the information collected while helping ensure required details are entered before records are saved.
Creating Qualification
Go to the Requirement New module.
Select the Qualifications tab.
Click Create Qualification.
Complete the required fields and any optional fields, if applicable.
Under Qualification Group, either:
Click + New Qualification Group to create a new group, or
Select an existing qualification group from the list.
Add fields based on your requirements.
Click Create
Creating Accreditation
Go to the Accreditations tab.
Click Create Accreditation.
Enter the accreditation details.
Click Create.
Assigning Qualifications to an Accreditation
Open the Accreditation.
The right-hand panel contains the following tabs:
Details – Displays the accreditation details.
Assignments – Displays the Roles, Hierarchy Nodes, Clients, and Sites where the accreditation has been assigned.
Assigned Qualifications – Displays the qualifications linked to the accreditation.
Select the Assigned Qualifications tab.
Click + Assign Qualification.
Select the qualification(s) to be included.
Click Assign to save the changes.